We all come across the situation where everything in a shot needs to be in focus, yet our equipment only allows for part of it to be in focus. So we stop down. F/11, F/16… still no good. F/32 is close, but still no cigar. The solution of “stopping down” may work, but still has its drawbacks. At f/32, there is little light left to work with and shutter speeds are getting too slow to handhold the camera. Cranking up the ISO to counter that reveals too much noise. Apparently there’s no way to win.
So I tried the method called “Focus stacking”. I have done this successfully with Photoshop, but you all know I like to keep things simple. Photoshop is far from simple and skipping a single (undocumented) step in the process can and will mess up your result.
So Lightroom at 100% it must be.
Lightroom in its latest versions includes a very powerful exposure stacking addon and creates good HDR shots from differently exposed pictures. It stacks them together and you’re off to the races. Focus stacking… not so much. Focus stacking has you taking several shots of the same subject, focused on different depths. You do that by setting the camera focusing to manual and taking a shot. Then move the focusing ring a little and take another shot. The more shots in the series, the better the end result. But beware of processing times.
So now that we have the input images, we need to get something to have Lightroom do the rest. And Lightroom has nothing for that. So we go for a plugin called LR/Enfuse. This handy little plugin was already well-known for its excellent quality of HDR generation. However, it is way more powerful than we give it credit for.
So, go ahead and download it, install it and open it up. In its “shareware” form, it is limited to a 500px wide or high image, enough to see what it can do, but insufficient for good results. So please donate a bit (5 Euros is about a big cuppa Joe where I am, so that’s not too much to ask), it will give you a registration code to get full-sized images.
By default, LR/Enfuse is set to produce HDR images, or exposure-stacked images, so let’s go and change that.
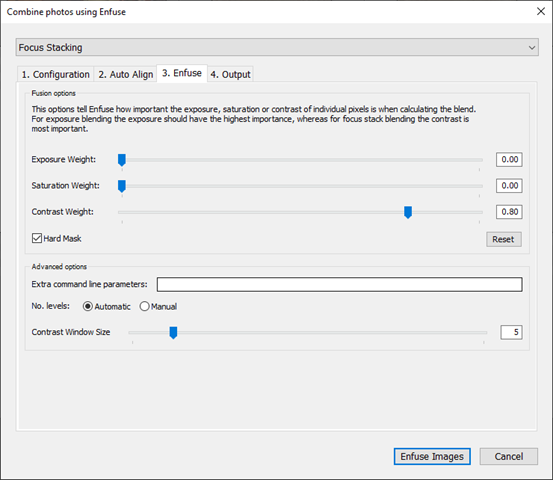
The way I set this up is to reduce the importance or weight of both Exposure and Saturation, then crank Contrast way up. Depending on the subject, these settings can vary for the contrast slider. The others remain at 0.
Time to shoot something.
I chose my desk, cluttered it up a little and put my camera on a tripod with a 60mm f/2.8 macro lens on it. This is not required, but I wanted to have the maximum aperture of f/2.8, which has the minimal depth of field I have in any lens.
Here are the images I used:







As you can see, the point of view does not change, yet the focus point is shifting from front to back. It allows for a small portion of the image to be sharp, the rest is out of focus. In other words, this is what you’d get while shooting normally.
Blending these shots together using LR/Enfuse with the above settings yields a very different image.
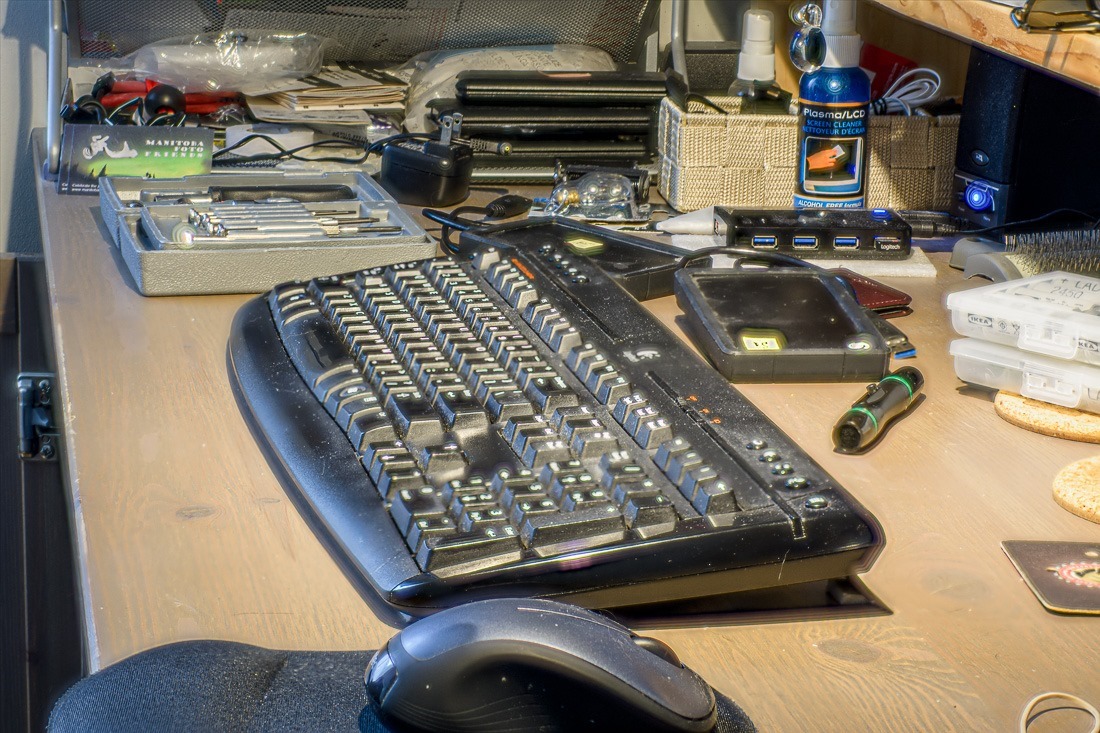
All the out of focus parts have been removed, while the sharp parts have been blended together.
The settings tell us that preference should be given to Contrast. And contrast is another way of determining sharpness in a shot. If the contrast is high, then the shot is sharp. If it is low, sharpness is equally low. Sharpening programs have all worked at some point on the contrast level of an image. While older programs simply cranked up the contrast, newer programs will concentrate on the micro-contrast. Contrast between very small groups of pixels, in other words.
Some artifacts are still a bit too visible in my taste, like the yellow sticker on the first hard drive in the shot and on the lens-pen, more shots with less guessing for LR/Enfuse would make that a thing of the past.
The goal here was to create a focus stack using Lightroom “alone” and that is just what I have showed.
Now it’s time to dust off my keyboard, this stacking method seems to bring out the dust a bit too much ![]()
Enjoy your stacking!
